Now that you have your project set up, you can start adding team members.
1You'll find your team and permissions settings by navigating to Project Settings, then clicking Team & Permissions. Here, you can invite members to your project as well as manage their permissions and notifications.
To start inviting team members, click the Invite button in the right-hand corner of the page. It looks like this:

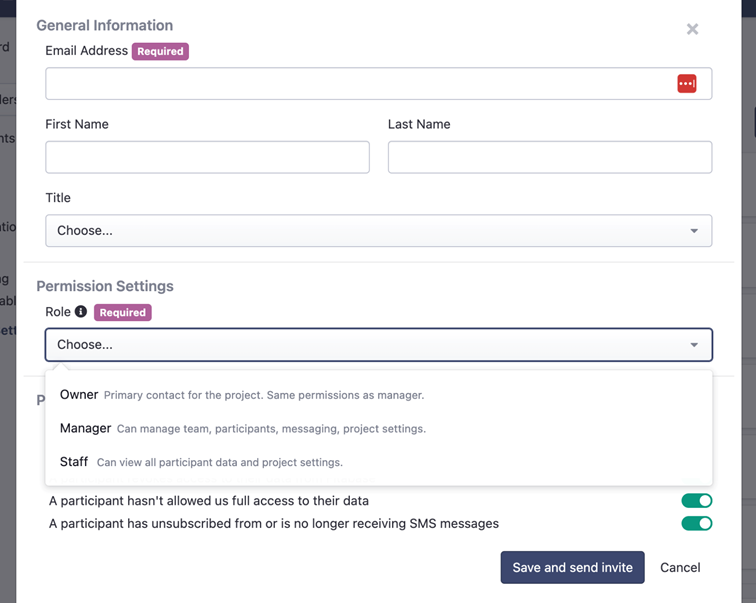
Clicking this button will open up a form for sending an invitation to a team member's email address.
2Once you fill out relevant details (email address, name, title), you'll set permission settings for each team member. These permissions settings can be changed later by project owners.
We have three permissions settings: Owner, Manager and Staff.
Owners are the primary contact or contacts for the project. You can have more than one project owner. These team members can manage the team list by inviting and removing them, manage participants, create and manage any messaging options you’ve added on to your project and update or change overall project settings. They are also required to have email notifications toggled on so Fitabase ensures important information is reaching at least one person associated with the study. They cannot change their email notification settings.
Managers have the same permissions as project owners but are not considered the primary contact. Because of this, they can change their email notification settings.
Staff can see all participant data but cannot view or change participant phone numbers. They also cannot change their own role in the Project Team Members settings.

Once you've filled out the invitation form, click the save and send button. It looks like this:

Your team member should receive an email with the subject line: "You're invited to join [Your Project Name] on Fitabase" from the email address noreply@fitabase.com. For them to get set up, you'll need to provide them the invitation code you'll also find on your Team & Permissions page at the top. It will show up in a box that looks like this:

You can share this code with the team members you invite however you like. This code will live on this page indefinitely, so no need to save it elsewhere.
4Once you've sent the project invitation, you'll see the newly-invited project member on your team list. Once the team member accepts the invitation and gets all set up with Fitabase, "Invite not yet accepted" will disappear from their entry:

Tip: Managing your team
To change team members settings or notifications, click on the three dots to the side of their name and click "Edit." You can also remove a team member by clicking on the three dots and choosing "Delete" (don't worry: this won't happen automatically. We'll confirm with you in a second step to make sure you've hit the right button!).